Showing posts with label pasta. Show all posts

Sunday, March 10, 2013

Jeweled Cardamom Comfort: Koshary .. kind of.


This first time I read about koshary, it was in the hazy heat of July. And I drooled. Seriously. Even has I was drinking endless cups of iced tea and lemonade and eating nothing but watermelon and Popsicles, this recipe for a big pot of tasty carbs, made me hungry for the comfort they promised. But then I saw this cherry sherbet and forgot all about the rice, lentils and pasta. Boo for me.

Even though I favoured pitting cherries over stirring pots of grains infused with spice that summer, the idea of koshary stayed in the back of my mind, and then one day last month -- pop! I'm going to make koshary. Originally, I thought of it because I thought it would be great accompanied by a dollop of rhubarb raisin relish that we recently acquired from a cute little store in the market. But in the end, I strayed from that idea.


I strayed from the traditional elements of koshary as well. It is supposed to be served with a spicy tomato chickpea sauce and fried or caramelized onions, but I only had dried chickpeas that hadn't soaked, no tomato product in the house, and not enough patience to caramelize onions --  I was totally having the Sunday panics. Darn. But I did have a beautiful head of cauliflower beaming up at me, and I thought that this roasted cauliflower would go perfect with all that carby goodness. And it totally did. Next time I'll definitely try chickpeas, but this cauliflower was perfect with the dish -- tangy and earthy from the za'atar spice it was coated in, and still retaining a nice satisfying crunch.


For ease, I cooked the rice and lentils -- brown medium-grain Japanese rice and green lentils -- in the same pot, like a pilaf. The green lentils held up well during the slight over-cooking while waiting for the brown rice to get tender. Spices were simple -- just a some cumin, turmeric and a few cardamom pods. But I did use a special ingredient that I've never used before: preserved meyer lemon. It's really unique tasting and very salty- so I didn't add any salt to the pilaf. You could totally substitute this with a squeeze of lemon juice, the zest of half a lemon, and a good pinch of salt, although if you went this route, I'd wait til the very end to add the lemon. I also threw in two big handfuls of  baby spinach for a bit of green, and topped the whole thing off with a sprinkling of pomegranate arils. I happily dug into this delicious bowl of carby comfort and I am pleased to say that it totally set me right for Monday morning.

Koshary with Roasted Cauliflower
serves 2 hungry people -- doubles nicely
adapted from Everybody Likes Sandwiches

For the cauliflower
half a head of cauliflower, broken in the florets and washed
juice of half a lemon
a splash of olive oil
1 teaspoon of za'atar spice mix
a good pinch each of salt and pepper

1. Toss everything together in large bowl and spread evenly on a baking sheet. Bake at 350 for about 10-12 minutes, tossing once or twice, or until the cauliflower reaches your desired tenderness -- I like a slight crunch still remaining.

2. Put your pasta and pilaf on while your cauliflower is roasting.

For the koshary
1 cup of short pasta -- I used brown rice vegetable spirals
1/2 cup of brown rice
1/4 cup of green lentils
1/2 onion, chopped
an inch bit of ginger, finely minced
1 clove of garlic, chopped
1 teaspoon of turmeric
1/2 teaspoon of ground cumin
4 whole cardamom pods
a few good grinds of pepper
1 tablespoon of chopped preserved lemon (about an eight of a lemon)
2.5 cups of water
3 cups of baby spinach, or chopped spinach
2 handfuls of pomegranate arils -- about half a fruit's worth

1. Cook the pasta according to the package directions. Drain when it's almost done -- when it's still got a tiny bit of a bite to it. Set aside.

2. Saute the onions, garlic and ginger in a pot for about 1 minute, or until things start getting soft and fragrant. Add the spices and preserved lemon, and stir well. Add the rice and lentils and toss in the oil and spices. Cook for about 1-2 minutes so things get a bit toasty.

3. Add the water and mix well. Cover, turn down the heat to a simmer, and cook until most of the liquid is absorbed and the rice is almost tender -- about 20 minutes.

4. Add the spinach and pasta, and mix well. Cover for about 2 minutes to let the spinach wilt and to let the pasta and rice finish cooking.

5. Serve in bowls topped with the roasted cauliflower and handful of pomegranate arils. This would also be lovely served family style, in a large, shallow serving dish.


Sunday, December 9, 2012

Noodly Goodness


It's time for some supper. I've made post after post of baked goods and treats -- indulgent and healthy breakfast worthy treats -- but now I think it's time for some supper.  Yes, supper. Some winter-comfort-in-a-bowl supper.

Where I live, winter is a bit wonky. It's warm and balmy one day, sunny and icy-cold the next, and then rainy and dreary for a week after that. It snowed a tiny bit, but nothing that lingered, and right now, there's a freezing rain alert out there. It's definitely not a picture perfect winter with bright sunny skies and fluffy snow on the ground, although I remember a time when there was. Last winter was rainy and mild, and I'm not yet sure what winter has in store for us this year, but whatever it may be, I know I'll definitely need quick, comforting suppers to drive away the overcast blues.

It's definitely stew and soup season, and I've got a few that I'll post soon, but today, it's all about the noodles. For awhile, I avoided pasta, partly because of the bad reputation that carbs were getting, and partly because pasta was beginning to not sit right in my stomach. Since discovering brown rice pasta, those days are over. And this dish is the perfect celebration of pasta. Spirally noodles mingle with toothsome black beluga lentils and velvety ribbons of spinach, all held together in a creamy sauce made from pureed squash and plenty of garlic. It's so totally simple, with fresh, natural flavours -- no overwhelming spices, just the beautiful, fresh, sweetness of vegetables hanging out with the mellow, woodsy lentils and pasta. It reminds me of macaroni and cheese because of the creamy squash, but it's totally vegan, heart-healthy and more than delicious.


For this beautiful noodle dinner, I would definitely take the time to roast and puree your own squash. It's simple and so much better than the canned stuff. Plus, if you can get your hands on an ambercup squash or kabocha squash, the flavour is out of this world -- sweet, nutty, buttery .. perfect in this pasta dish, but also in pies and sweet baked goods. All you do split the squash, and after scooping out the seedy slimy bits, cut them into chunks and roast them cut-side down in an inch of water for about 45 minutes at 350 degrees or until their they're super soft and tender. Let them cool down a bit, then the skins come off easily. Throw all the flesh into a pot, add a bit of water and then blend using a hand-blender. I stored my leftover squash in a sealed glass container, and it kept fine for a week.

Happy Winter!

Pasta and Lentils with Squash and Spinach
inspired by Everybody Likes Sandwiches
serves 2-3

2 cups of dried spirally pasta (rotini or fusili)
1/2 cup of dried beluga lentils

1 large clove of garlic
olive oil
1 cup of pureed squash
1 small bunch of spinach, washed and chopped
1/2 cup of water or stock
1 teaspoon of herbes de Provence
salt and pepper to taste

1. Cook the pasta according to the package directions. Drain and set aside.

2. Cook the lentils in water for about 15 minutes, or until they are tender but not mushy. Drain and set aside.

3. While the pasta and lentils are cooking, prepare the sauce. Saute the garlic in olive oil over low heat until things get soft and fragrant. Season with salt and pepper and herbes de Provence.

4. Add the spinach and stock. Stir well and turn up the heat to medium. Cook until the liquid comes up to a boil. Add the squash and stir well.  Add the lentil and pasta and give it a good mix.

5. Let the mixture hang out together for a few more minutes over low heat, adding a bit of stock if things start to get too dry.

6. Serve immediately.

Sunday, May 27, 2012

Roasted Tomato Orzo Salad


Make this NOW!  If you're buried under work and don't have time to cook, but still want to taste that sunshine outside in your kitchen, make this salad.  Make a big batch and let it sit in your fridge. It only gets better with time.  Eat it all week for lunch, or supper.  Add some chopped raw cucumber, blanched broccoli or a nice green salad on the side and you're totally set.


The first time I made this salad, I totally fell in love with it. The second time I made it, I added chopped red onion and it was even better.  You could totally play with it -- add chopped roasted or raw red peppers, zucchini, roasted garlic, whatever you like.  Or keep it simple and enjoy it just as much.

Don't sweat it.  It's easy.  Take 30 minutes out of your work-at-home time and make this salad.  You'll be so glad you did.  Make it even if you're not busy, and spend the rest of your time biking outside, having coffee or beer on sunny patios or planting the garden.  It's THAT good.  Go for it!  Happy eating!

Roasted Tomato Orzo Salad
serves lots!

1.5 cups of uncooked orzo
4-5 ripe tomatoes, or couple pints of cherry tomatoes, chopped or halved
a big splash each of olive oil and balsamic vinegar
1 big pinch of salt
1 few good grinds of pepper
1/2 red onion, diced
3-4 basil leaves, chopped
a few sprigs of oregano (or use thyme, or parsley .. anything you've got on hand!)

1. In a large pot of water, cook the orzo for about 15 minutes, or until tender and/or al dente.  Drain and set aside.

2. While the pasta is cooking, toss the tomatoes in the oil, vinegar, salt and pepper.  Spread it out on a baking sheet and roast on high (under the broiler) for about 15-20 minutes, or until the tomatoes break down and the juices get kind of sticky.

3. Put the pasta in a large bowl and add the onion.  Toss with the tomatoes and their juices.  Add in the chopped herbs and toss again.  Let it cool in the fridge, if you can wait, or just dig in.  It's ten times better when you pull it out a few days later.

Tuesday, August 17, 2010

A Lobster Tale


Ok, so you know that trick with making iced tea so that summer would last longer? Yeah, I don't think that's going to work, but thanks for helping me out anyway. I've come to accept that fall is coming and I've even psyched myself up to be excited, even if it means work starting again and summer holidays ending. I've realized that as long as my summer memories are vivid in my mind, I can relive them, even after a long day of trying to tame and teach adolescent hormones. This blog is helpful because it means I don't have to dig out USB keys and memory cards to look at pictures -- my memories are just a click away. Whew!


Speaking of summer fun, I recall promising you a lobster tale. I'm already getting giddy remembering the story, so I'm sure that re-telling this tale in this post will solidify it in my mind, thus keeping it in the front of my memory for as long as possible. So here goes; I'm just going to say it. We made lobster bisque in a motel room. Details? Why, of course! Remember that beach lobster that we had on one of the last days in Moncton? Well, we saved the shells and some of the meat, with the idea of making bisque as a last dinner on our vacation. However, we ran into some roadblocks along the way. Our "kitchenette" at the motel was nothing more than a counter with a sink, a microwave and a hot plate. There were a few bowls and a shallow Pyrex glass dish. No pot. Did this put an end to our lobster plans? Nope. My ingeniously culinary partner pressed on. A quick trip to Sobeys for vegetable broth, potatoes, garlic butter, onions and tomatoes and the adventure began. This first part went smoothly. He sweat he veggies and set them aside (inside the ice holder!) and proceeded to pan roast the shells using the pyrex dish and hotplate. The smell was so wonderful. Then, stuff happened. As we were pouring the broth into the roasted shells, we heard a crack. Yup, we overheated that Pyrex dish and it cracked. BUT .. we poured the shells and broth into three bowls and .... yes ... we... microwaved it. A quick strain using a three dollar coffee strainer, a little mix with the veggies and into the microwave it went again. When we heard the final "ding!" we stirred in a little cream, topped it with leftover lobster meat and proceeded to taste. Oh .. my ... god. I would never have thought that it would taste so good. Very lobster-y, al dente potatoes, rich tomato flavour .. it was the perfect adventure to end our vacation.


But that's not it! Did you know that you can buy LIVE lobster at the airport in Moncton and FLY IT HOME? It was ingenious! They packed the lobsters with vaccum sealed frozen veggies and they stayed lively all the way to Toronto. A nice surprise for my family. That very night, we cooked it and the next day we took it over to my parents' where we made a lovely lobster soup/stew. It was wonderful, simple, yet unconventional. Simple veggies get sauteed, just like in the motel, and mixed with a touch of paprika. The lobster shells are roasted in the pan, and get some simmer time with water and broth. When everything gets put back together, it's thickened with rice. Twenty minutes later, you have a rustic, hearty, healthy very lobster-y stew that's rich without needing artery-clogging ingredients. I also have one more recipe to leave you with -- linguine with lobster meat. It's a simple pasta toss -- the sauce kind of coming together with a combination of tomatoes, lemon juice and pasta cooking liquid. It's fresh, tasty, and a lovely way to use up the lobster meat after you've used the shells to make the soup. So, if you ever find yourself indulging in lobster, please try these recipes and seriously consider visiting the east coast of Canada .. although before hand, make sure your "kitchenette" has an actually stove ... oh yeah, and pots and pans would be helpful too!

Lobster Soup/Stew

the shells of 1 medium-sized lobster
1 shallot
1 clove of garlic
2 medium carrots, diced
2 stalks of celery, diced
3 medium tomatoes, roughly chopped
3 new potatoes, diced
1 teaspoon of sweet paprika
4 cups of vegetable broth
3 cups of water
1 cup of jasmine rice
olive oil, salt and pepper

1. In a large pot, sweat the shallots and garlic until soft and fragrant. Add the carrots, celery, potatoes, tomatoes and paprika and cook on medium-low heat until the carrots, celery and potatoes start to soften and the tomatoes start to break down a little. Season with salt and pepper. Remove this mixture to a bowl and set aside.

2. In the same pan, roast the lobster shells in olive oil over medium-high heat for about 7-10 minutes. Add the broth and water and simmer for 15-20 minutes on medium-low heat, covered. Make sure you scrape the brown lobstery bits from the bottom of the pan.

3. Strain the shells and put the liquid back into the pot. Add the reserved vegetable mixture and rice and bring the liquid up to a boil. Reduce the heat to medium-low and simmer for another 20 minutes, uncovered until the veggies become tender, and the rice is cooked. Turn off the heat and let stand, covered for another 10 minutes, or until the rice has exploded and the liquid has thickened up nicely.

4. Season to taste, take a bite, and pretend that you're in Moncton.

Lobster Linguine

250 grams of linguine
a handful of grape tomatoes, quartered
1 shallot, minced
1 clove of garlic, minced
the juice and zest of one lemon
2 teaspoons of chili powder
the meat from one medium lobster, chopped
a bunch of spinach, roughly chopped
a handful of fresh herbs, chopped (I used basil, lemon thyme and parsley)
olive oil, salt and pepper

1. Boil the pasta according to package directions in large pot of salted water. Set aside 1/2 cup of the cooking liquid for later.

2. Cook the shallots and garlic in olive oil until soft and fragrant. Season with salt and pepper and add the chili powder. Cook for about a minute and then add the tomatoes. Cook for another 3 minutes, or until the tomatoes start to release their liquids.

3. Add the pasta, reserved cooking liquid, lemon juice and zest and toss. Add the lobster meat and spinach, and cook for another minute or so, just until the spinach has wilted and turned bright green.

4. Finish with fresh herbs, and more pepper if needed.

Friday, May 28, 2010

Herby Summery Salad


I don't know about your part of the world right now, but where I am, things are starting to heat up. It's like all of a sudden, spring decided to turn into summer over night, and we've been treated to hot hot temperatures that make me feel like it's July. Don't get me wrong -- I looooooove the summer and hot weather, but when you have a south facing classroom on the west side of the school, your afternoon classes are more than a bit warm. And my poor students -- it's not that they don't want to participate, they just can't. The weather has steamed off every last bit of energy they have. And to top it off, I've come down with some sort of summer flu/cold that's got me feeling less than energetic.

Hot weather + summer flu + 4 weeks till the end of the year = a not very enthusiastic class. This short week felt long, and I have a feeling that June is going to drag on and on. But you know what? I don't mind a bit. June is fun.. well, when the students aren't crazed with summer fever or hyper from all the freezies they're buying at lunch time, June can be relaxing. Report cards are almost done so we're not that worried about marks, we can take our classes outside for some lessons under the shade of a tree, and there's an excitement in the air in anticipation for the upcoming 2 months off. June is great.


But, the hot weather is not making me feel like cooking, or eating for that matter. There's nothing that steamy hot days to make my appetite plummet, unless we're making cold, summery things.. like summery pasta salad. I've got bad memories of pasta salad -- overcooked macaroni covered in a goopy, neon yellow-coloured dressing that screams heart attack in one bite. Not a good thing on a hot day. To me, pasta salads should be the exact opposite: fresh light, lemony, tangy, cool and refreshing. Yeah, that's a pasta salad, and that's what I was craving earlier this week. My craving came just in time, because we had just planted tons of herbs on our balcony and purchased some local grape tomatoes from the market. A quick stop at the cheese store for some boccaccini, and dinner was almost ready. A little snag to deal with first: no red onion (which would have been perfect), so we substituted a bit of julienned, blanched leeks, which weren't ideal but tasted good enough along side the carrot, broccoli and of course, pasta. A lemony vinaigrette loaded with fresh thyme and a healthy dose of basil made this pasta salad come alive. And the boccacinni added a little creaminess without overwhelming the salad. It's a neat little cheese -- I'd never bought it before or cooked with it, and at first when I bit into it, it tasted like nothing. But as I kept chewing, a lovely, creamy cheesy taste came out: perfect to round out the sharp, mustard-y dressing and mild veggies.

Ok, so I change my mind about the hot weather making me not want to eat. I'll take this salad on the hottest day in July. Bring it on, summer!

Summery Pasta Salad

juice of half a lemon
2 teaspoons of grainy mustard
1 teaspoon of honey
2 sprigs of thyme (minus the tough stems of course!)
1.5 tablespoons of olive oil (or adjust to your taste)
salt and pepper to taste

2 portions of short pasta (I used vegetable shells)
a small handful of grape tomatoes, quartered
half a head of broccoli (asparagus would be nice too!)
a bit of julienned leeks (or use red onion if you have it)
a small carrot, julienned
4 mini boccaccini balls cut or torn up
a big handful of fresh basil leaves, chopped roughly or torn up

1. Make the vinaigrette by mixing together everything except the olive oil first. Then, slowly add the olive oil while whisking. Adjust the seasonings to taste. Let it sit in the fridge while you make the pasta.

2. Boil your pasta. When it's about 5 minutes from being done, add in the broccoli. After another 2 minutes, dunk the leeks in with a sieve and then remove. Drain the pasta and broccoli and put them in a large dish.

3. Add your carrot, leeks, boccaccini and basil and give it a little toss to disperse all the ingredients. Add in your vinaigrette and give it another good toss. If you can wait, let it sit, covered, in the fridge for another 10 minutes or so before digging in.

Friday, April 2, 2010

An Updated Comfort


I have a theory about comfort foods that many of you probably won't like. Yeah, ok, I know I'm going to make some enemies, but here it goes. A lot of foods that I see as being "comfort foods" are only comforting whilst you're eating them. An hour later, that comfort becomes indigestion, bloating and a whole bunch of other things that I shouldn't mention on a food blog. This is my dilemma. So how have I fixed that? Well, up until recently, I just practiced my willpower and simply abstained. But that's no fun at all .. right?

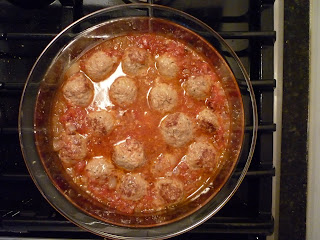
Enter: creative, thoughtful chef-trained partner who is constantly thinking of ways to make rich foods lighter so that I can partake. Aren't I so lucky? :) Over the past few years, I've had macaroni and cheese made with skim milk, cream-free creamy tomato sauce (the creaminess came from roasted eggplant!), and the silkiest, creamiest butternut squash soup sans dairy or soy. The other night, I came home to pasta and meatballs, an updated version. It wasn't covered in rich cheese or a heavy, thick sauce that had been simmering all day. It was light, yet hearty with a beautiful fresh, broth-y sauce that went so well with the coming of spring. And to top it off, it was cooked in a beautiful Bodum glass casserole dish that we found at a thrift shop.


Now, I take absolutely NO credit for this recipe; but seeing as my partner is too shy to blog and I didn't want this wonderful recipe to be overlooked, I'm giving it to you now. I'll also let you know that it was quite a struggle getting the recipe and method down. These chef-types cook on a whim, so I apologize if some of the instructions are a bit vague. I hope you'll try it anyway, and I hope you'll be inspired to update some old favourites.

Spring time Pasta and Meatballs

1 pound of ground chicken
2 egg whites
1/4 cup of breadcrumbs (we used panko)
3 teaspoons of chopped fresh thyme
1 teaspoon of chopped fresh rosemary
1 thai red chili, minced
a dash of hot sauce
2 dashes of Worcestershire sauce
1 teaspoon of dark soy sauce
salt and pepper to taste

one small onion finely diced
3 cloves of garlic cut in half
1/2 cup of water
1 28 oz can of diced tomatoes (the no-salt added kind)

1. Put the first 10 ingredients in a large mixing bowl and mix together gently until everything is incorporated. Be careful not to over mix. Use your hands -- they work the best!

2. Shape the meat into balls and let it rest, covered, in the fridge for an hour.

3. Using a wide skillet and a bit of olive oil, brown the meatballs in batches and set aside.

4. In the same pan, saute the onions until brown. Add the water to de-glaze the pan, making sure you get all the brown chicken-y bits from the bottom. Add the tomatoes and garlic, and season with salt and pepper.

5. Put the meatballs in an oven-safe casserole dish and add the tomato mixture on top. Bake, covered, in a 350 degree oven for 25 minutes or until the meatballs have cooked through. Now would be a good time to put on the pasta!

6. When the meatballs are done, dump in the pasta and stir it around. Let it sit (if you can wait!) for about 5 minutes so the pasta soaks up some of the liquid and gets extra yummy.

7. Enjoy, knowing that this time, that comforting feeling is going to last..