Saturday, March 30, 2013

The Rice Guy


You know how seasoned home cooks have a "fish guy," or "meat guy" that they trust to give them quality stuff all the time? Well, we have a rice guy. He runs Rube's Rice -- the island of rice and grains and legumes on the bottom floor of St. Lawrence Market. He is our supplier of Nishiki and lentilles du Puy, is knowledgeable about cavena nuda and was the first to introduce me to jade pearl rice.  

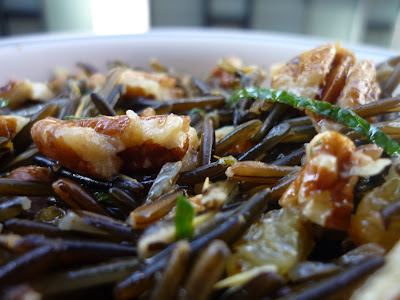
Today, we felt like splurging, so we picked up a bag of Canadian-grown wild rice. As we were paying, he handed us a slip of paper with a recipe for wild rice salad on it and told us to give it a try. Off we went to the bulk store next door to pick up the rest of the ingredients, and I'm so glad we did.


This salad tastes fresh and fragrant like spring, and yet is made from ingredients that you could easily find in the winter. It's got a mild sweet dressing of orange juice, olive oil, salt and pepper, a sweet richness from pecans and golden raisins, a savoury sharpness from finely chopped shallot, and a nice spring freshness from a handful of fresh mint -- all wonderful flavours that don't overpower the herbal nuttiness of the wild rice.  When I make it again, I might add a splash of red wine vinegar to give the dressing add bit more zing, and perhaps a few chunks of orange segments to add a burst of juiciness.

Want more reason to make this salad? It's vegan, gluten-free and very filling. Wild rice is a beautiful backdrop for a switch-up in fruits and nuts -- walnuts or slivered almonds, dried cranberries or cherries, a sprinkling of pomegranate arils .. It probably tastes better the following day -- meaning that you could make a big batch, have some with your dinner and have leftovers that will taste even better to pack for lunch. Do I need to go on?

Thank-you Rice Guy!

Wild Rice Salad
adapted from the Rice Guy :)

2/3 cup of wild rice
2.5 cups of water

1/4 cup of chopped pecans
1/4 cup of golden raisins
zest and juice of half an orange
1 tablespoon of olive oil
1 teaspoon of minced shallot
a small handful of mint, torn or chopped
salt and pepper to taste

1. Rinse the wild rice well. Place it in a pot with water. Bring to boil, then cover and lower the heat to a simmer. Let it cook for 40 - 45 minutes. Check it at the 30 minute mark to see if you need to add more water. Drain and place in a large bowl.

2. Add the rest of the ingredients to the rice and toss well. Let it sit for 2 hours (if you can wait! We couldn't!) or overnight.

3. Enjoy!

Monday, March 25, 2013

A Sure Sign of Spring: Rhubarb


It's still a bit nippy out there. The winds are still whipping by my face in the morning, and I still reach for my pair of fuzzy socks when I'm walking across the cold concrete floors.

But ... spring is definitely on the way. It was warm enough for me to take my hat off this afternoon, the sun peaked at us for more than just a few minutes, and this past weekend, I saw rhubarb in the market. Yup, rhubarb -- those beautiful pinky-red stalks of deliciousness. They are a sure sign of spring. I couldn't resist snatching up a bunch and immediately turning them into something sweet and gooey and tasty. And what could be easier than a crumble?


I mixed my rhubarb with a crisp apple to give it a little sweetness, and added a double dose of ginger -- candied and fresh -- to give this dessert a little spice. It's the perfect mesh of flavours to have while winter melts into spring -- fresh and tangy, warm and spicy. Perfection!

Because I baked this crumble in a smallish baking dish, it ended up being more like a pandowdy -- the top of the crumble topping turned nice and brown and crumbly, but the because it ended up being such a thick layer, the further you went down, the more biscuit-like it turned. Totally fine by me, though. The biscuity parts were tender and tasty and soaked up the rhubarby-gingery juices really well. It was the perfect way to end a meal, and as the original recipe suggests, also perfect served with a dollop of yogurt and alongside a strong coffee for breakfast.

Happy spring!!

Rhubarb Apple Ginger Crumble
adapted from Poppytalk

For the Fruity Part
1 pound of rhubarb (about 4 large stalks)
1 large apple (I used a Jonagold)
1/3 cup of brown sugar
1 tablespoon of minced fresh ginger
1 tablespoon of candied ginger, chopped fine
juice and zest of a lemon

1. Mix all the ingredients in a large pot and heat gently -- stirring frequently. Let the fruity mixture bubble and cook for about 5-7 minutes, or until the rhubarb and apple start to get soft and juicy.

2. Pour the mixture into a baking dish -- keep in mind that if you use a smaller (like 6inch) dish, you'll get pandowdy-like results -- biscuity with a bit of crumble on the top. If you more crumble/crisp- like results, use a larger dish.

For the Topping
1 cup of spelt flour
1/2 cup of rolled oats
1/4 cup of brown sugar
1 tablespoon of minced fresh ginger
1 tablespoon of candied ginger, chopped fine
1/3 cup of butter (I used Earth Balance)


2 tablespoons of maple syrup

1. Mix the flour, oats, sugar and gingers together. Using your fingers, rub the butter into the flour mixture until you get a coarse mealy texture.

2. Add the maple syrup and use a spatula to incorporate into the crumble. Spread the crumble mixture over the fruit mixture.

3. Bake in a 350 degree oven for about 30 minutes, or until the fruit starts bubbling up over the top, and the crumble is nice and golden brown.

Monday, March 18, 2013

Back to the Whirlwind: A quick little supper


March Break = Finished. This year, I didn't make a list of to-dos ... I just did! Brunches, coffees, programming, writing, adventuring, baking. I usually love lists, but they felt a bit constricting this year, so I just played it by ear. And it was a truly relaxing and productive week. Score on all fronts!

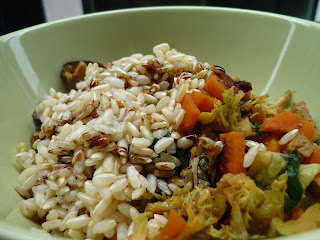
Today, it's back to the whirlwind of the classroom, and that bowl of cereal is just to tempting to call supper, so I'm presenting you with a beautiful, quick and healthy supper dish that's satisfying and easy to prepare: Mushroomy veggie bowl. It's inspired by a veggie steamed bun that I bought for a snack one day at the dim sum stand at T&T.  It's a simple saute of shredded cabbage, carrots, spinach, ginger, tofu and Chinese mushrooms seasoned with splashes of soy and toasted sesame oil. Very classic and very simple. The first night, I had this mixture over brown rice veggie spirals, and I had leftovers over brown rice with an extra drizzle of dark soy. Delicious bowls both ways. Nix the tofu and replace with left over chicken breast if you're feeling carnivorous, or use chickpeas as your protein bump instead. Either way, keep it simple -- that's what we're going for here.


For this recipe, I used dried Chinese mushrooms that I re-hydrated in water about 30 minutes before I started cooking. They have a really intense mushroomy flavour that gives this dish a real body. I'm sure fresh mushrooms would work well too -- especially ones like shitakes or king oysters -- although if you go that route, the mushroomyness will be a lot tamer.


I have another bowl coming up later this month.  They never get tiring around these parts and are a welcome distraction from the cereal box.

Mushroomy Veggie Bowl
feeds two hungry people

2 servings of dried pasta or
1 cup of brown rice + 2 cups of water

4-5 dried Chinese mushrooms
2 cups of shredded savoy or napa cabbage (about 5-6 leaves worth)
1 large carrot, finely diced or shredded
1/ 2 package (about 3-4 ounces) of firm tofu, but into cubes
a handful of baby spinach or chopped spinach
an inch bit of ginger finely chopped
a big splash each of dark and light soya sauce
1/4-1/2 cup of water or vegetable stock
a big grind of black pepper
1 tiny drizzle of toasted sesame oil

1. Put your dried mushrooms in a bowl of water. Let them sit while your prep everything else.

2.  Cook your pasta according to the package directions. Drain and set aside. OR: Put 1 cup of brown rice and 2 cups of water in a small pot. Bring to boil, then lower the heat, cover, and cook for about 20 minutes, or until the rice is nice and tender.

3. While your rice or pasta is cooking and your mushrooms are soaking, prep your vegetables. Heat a bit of oil in a saucepan and saute the ginger for about 1 minute or so, or until it starts to get fragrant and a tiny bit brown.

4. Add the carrots and cabbage and stir well. Your mushrooms should be ready! Squeeze out the excess water, slice them up and toss them in with the carrots and cabbage. Add your tofu now too.  Add 1/4 cup of water or vegetable stock along with the soy and black pepper.

5. Mix well and cook for about 4 minutes, or until the vegetables are tender. Add in the spinach, and mix well. Cook for another minute or so, and then drizzle over the toasted sesame oil.

6. Serve over your pasta and rice.


Thursday, March 14, 2013

A March Pick-Me-Up


Last March break, I didn't need much of a pick-me-up. It was warm and spring-like and perfect for adventuring outdoors. The year before that was just as good. Sun streamed into my apartment and made for a wonderful, romantic space to work and bake. This year, the week started off promising -- last Saturday and Sunday were gorgeous. But as the week progressed, we saw rain, flurries and now, frigid temperatures. I do see the sun peaking around my balcony -- an excellent sign. But I'm going to need a little more than that to cap off my week of relaxation.

So, I made a little pick-me-up treat: sticky, crumbly date bars. I made them on Monday when it was rainy and damp and perfect baking weather. I haven't worked too much with dates -- I made a nice date snacking cake once, and added it to my granola a few times. But this time, they totally stole the show. And it was easier than I expected. Something magical happens when the dates get softened and cooked in water, and then pureed to a chunky, sweet, sticky filling. Just for kicks, I added some dried cranberries to the date mixture which added a nice subtle tang.


Besides the glorious filling, the rest of the recipe came together in a snap -- basic ingredients like flour, oats, milk, and oil made up the soft cookie-like base, and in the topping was much of the same, with an added sprinkling of nuts. I used chopped almonds, but I think walnuts or pecans would have been better. A handful of shredded coconut would have been a great addition. The whole thing gets baked until the top gets nice and golden. I was nervous when slicing because I thought the filling out ooze out and make a mess but it didn't. These bars are definitely soft and tender and probably won't travel too well in a ziplock bag, but they do slice without falling apart, and are definitely healthy enough to enjoy at breakfast.

The first time I remember eating a date square was with two friends, sitting at the Second Cup at Queen and Augusta (which is now sadly gone) and washing it down with an Italian soda. And while there's no buttery-rich crumble and crust in these vegan ones, one bite and I was sent back to that time.

Vegan Date Bars
adapted from The Yummy Vegan
makes one 8'8 square pan -- about 16 nice sized squares

For the filling:
1.5 cups of pitted dates
1/2 cup of dried cranberries (you could go 100% date -- just add a squeeze of lemon)
1.5 cups of water
2 tablespoons of maple syrup

1. Place the dates, cranberries and water in a pot. Bring to a boil, and then simmer, uncovered for about 10 minutes, or until the dates get soft and start to break down.

2. Puree using the hand-blender to your desired consistency. Add the maple syrup and stir well. Set aside.

For the base:
1 cup of spelt flour
1/3 cup of rolled oats
1/4 cup of brown sugar
1 teaspoon of salt
3 tablespoons of olive oil (or canola, or coconut)
1/4 cup of soy milk (or regular .. or almond)

1. Mix all the ingredients together in a large bowl until a soft dough forms. Press evenly into the bottom of a square baking pan.

For the crumble topping and assembly:
1/3 cup of spelt flour
1/4 cup of rolled oats (or spelt flakes)
1/4 cup of choppd nuts
3 tablespoons of maple syrup
1 tablespoon of olive oil
1/4 teaspoon of vanilla

1. Combine all the ingredients in a bowl. Mix until a loose crumble forms.  On to the assembly!

2. Spread the cooled date filling evenly over the base. Scatter the crumble topping on top and bake in a 350 degree oven for about 25 minutes, or until the top turns nice and golden brown.

3. Cool completely before slicing and enjoying.


Sunday, March 10, 2013

Jeweled Cardamom Comfort: Koshary .. kind of.


This first time I read about koshary, it was in the hazy heat of July. And I drooled. Seriously. Even has I was drinking endless cups of iced tea and lemonade and eating nothing but watermelon and Popsicles, this recipe for a big pot of tasty carbs, made me hungry for the comfort they promised. But then I saw this cherry sherbet and forgot all about the rice, lentils and pasta. Boo for me.

Even though I favoured pitting cherries over stirring pots of grains infused with spice that summer, the idea of koshary stayed in the back of my mind, and then one day last month -- pop! I'm going to make koshary. Originally, I thought of it because I thought it would be great accompanied by a dollop of rhubarb raisin relish that we recently acquired from a cute little store in the market. But in the end, I strayed from that idea.


I strayed from the traditional elements of koshary as well. It is supposed to be served with a spicy tomato chickpea sauce and fried or caramelized onions, but I only had dried chickpeas that hadn't soaked, no tomato product in the house, and not enough patience to caramelize onions --  I was totally having the Sunday panics. Darn. But I did have a beautiful head of cauliflower beaming up at me, and I thought that this roasted cauliflower would go perfect with all that carby goodness. And it totally did. Next time I'll definitely try chickpeas, but this cauliflower was perfect with the dish -- tangy and earthy from the za'atar spice it was coated in, and still retaining a nice satisfying crunch.


For ease, I cooked the rice and lentils -- brown medium-grain Japanese rice and green lentils -- in the same pot, like a pilaf. The green lentils held up well during the slight over-cooking while waiting for the brown rice to get tender. Spices were simple -- just a some cumin, turmeric and a few cardamom pods. But I did use a special ingredient that I've never used before: preserved meyer lemon. It's really unique tasting and very salty- so I didn't add any salt to the pilaf. You could totally substitute this with a squeeze of lemon juice, the zest of half a lemon, and a good pinch of salt, although if you went this route, I'd wait til the very end to add the lemon. I also threw in two big handfuls of  baby spinach for a bit of green, and topped the whole thing off with a sprinkling of pomegranate arils. I happily dug into this delicious bowl of carby comfort and I am pleased to say that it totally set me right for Monday morning.

Koshary with Roasted Cauliflower
serves 2 hungry people -- doubles nicely
adapted from Everybody Likes Sandwiches

For the cauliflower
half a head of cauliflower, broken in the florets and washed
juice of half a lemon
a splash of olive oil
1 teaspoon of za'atar spice mix
a good pinch each of salt and pepper

1. Toss everything together in large bowl and spread evenly on a baking sheet. Bake at 350 for about 10-12 minutes, tossing once or twice, or until the cauliflower reaches your desired tenderness -- I like a slight crunch still remaining.

2. Put your pasta and pilaf on while your cauliflower is roasting.

For the koshary
1 cup of short pasta -- I used brown rice vegetable spirals
1/2 cup of brown rice
1/4 cup of green lentils
1/2 onion, chopped
an inch bit of ginger, finely minced
1 clove of garlic, chopped
1 teaspoon of turmeric
1/2 teaspoon of ground cumin
4 whole cardamom pods
a few good grinds of pepper
1 tablespoon of chopped preserved lemon (about an eight of a lemon)
2.5 cups of water
3 cups of baby spinach, or chopped spinach
2 handfuls of pomegranate arils -- about half a fruit's worth

1. Cook the pasta according to the package directions. Drain when it's almost done -- when it's still got a tiny bit of a bite to it. Set aside.

2. Saute the onions, garlic and ginger in a pot for about 1 minute, or until things start getting soft and fragrant. Add the spices and preserved lemon, and stir well. Add the rice and lentils and toss in the oil and spices. Cook for about 1-2 minutes so things get a bit toasty.

3. Add the water and mix well. Cover, turn down the heat to a simmer, and cook until most of the liquid is absorbed and the rice is almost tender -- about 20 minutes.

4. Add the spinach and pasta, and mix well. Cover for about 2 minutes to let the spinach wilt and to let the pasta and rice finish cooking.

5. Serve in bowls topped with the roasted cauliflower and handful of pomegranate arils. This would also be lovely served family style, in a large, shallow serving dish.


Sunday, March 3, 2013

It's just the thing: Sticky and Spicy


I love all seasons. Summer is adventures and relaxing, sipping lemonade on hazy hot days, and endless afternoons. Spring is rejuvenation and long city walks outdoors, extra cups of coffee and excitement growing about farmer market season. Autumn is routines and brisk walks to work warmed by steaming tea and coffee, biting into crisp apples and hearty pumpkin stews. And winter. Winter is snow walks and hot chocolate, stirring pots of homemade rice pudding and shameless weekends spent in pjs. That's where I am today. It's past noon and I haven't changed out of my fuzzy socks and sweatpants, nor have I stepped foot outside into the icy flurrying skies during these last days of winter.

Although I've done my fair share of moaning about the cold weather, I still love winter. And I also love winter flavours. Yesterday, I noticed a lonesome jar of homemade marmalade in the back of the freezer and decided to pull it out to play with today. Marmalade on English muffins would have been a good breakfast, but I wanted to put it to use in a cake that I know I'd be craving later in the day. This beautiful sticky gingerbread cake is just the thing. Sticky and spicy, almost fudgy yet light and fluffy at the same time. It's vegan and made with spelt flour and a lot of ground ginger. It's got a big dollop of homemade marmalade in it, and just a whisper of dark cocoa powder to bring out all the spices. It's just thing to have with tea or coffee while you watch the flurries float down over the balcony and wait for spring to peak around the corner.

Sticky Marmalade Spice Cake
adapted from Bittersweet


1/2 cup of orange juice
1/4 cup of molasses
1/3 cup of marmalade (preferably homemade)
1/4 cup of apple butter (or apple sauce)
1/4 cup of olive oil
1/4 cup of dark brown sugar
1 cup of spelt flour
1/4 cup of all purpose flour
2 T cocoa powder
1.5 teaspoons of baking powder
1/4 teaspoon of baking soda
2 teaspoons of ground ginger
1/2 teaspoon of cinnamon
a pinch each of grated nutmeg and black pepper

1. In a large bowl, whisk together the orange juice, molasses, marmalade, apple butter, olive oil and brown sugar until well combined.

2. Sift in the flours, cocoa powder, baking powder and soda and all the spices. Mix gently and until just combined. Don't over mix.

3. Pour the batter into a prepared cake pan (I used a 9inch round pan) and bake in a 350 degree oven for about 30 minutes, or until the top is springy to touch and a cake tester inserted comes out clean.

4. Serve with a spicy chai tea, strong coffee or a few slices of clementines. ;)