Showing posts with label dessert. Show all posts

Monday, March 25, 2013

A Sure Sign of Spring: Rhubarb


It's still a bit nippy out there. The winds are still whipping by my face in the morning, and I still reach for my pair of fuzzy socks when I'm walking across the cold concrete floors.

But ... spring is definitely on the way. It was warm enough for me to take my hat off this afternoon, the sun peaked at us for more than just a few minutes, and this past weekend, I saw rhubarb in the market. Yup, rhubarb -- those beautiful pinky-red stalks of deliciousness. They are a sure sign of spring. I couldn't resist snatching up a bunch and immediately turning them into something sweet and gooey and tasty. And what could be easier than a crumble?


I mixed my rhubarb with a crisp apple to give it a little sweetness, and added a double dose of ginger -- candied and fresh -- to give this dessert a little spice. It's the perfect mesh of flavours to have while winter melts into spring -- fresh and tangy, warm and spicy. Perfection!

Because I baked this crumble in a smallish baking dish, it ended up being more like a pandowdy -- the top of the crumble topping turned nice and brown and crumbly, but the because it ended up being such a thick layer, the further you went down, the more biscuit-like it turned. Totally fine by me, though. The biscuity parts were tender and tasty and soaked up the rhubarby-gingery juices really well. It was the perfect way to end a meal, and as the original recipe suggests, also perfect served with a dollop of yogurt and alongside a strong coffee for breakfast.

Happy spring!!

Rhubarb Apple Ginger Crumble
adapted from Poppytalk

For the Fruity Part
1 pound of rhubarb (about 4 large stalks)
1 large apple (I used a Jonagold)
1/3 cup of brown sugar
1 tablespoon of minced fresh ginger
1 tablespoon of candied ginger, chopped fine
juice and zest of a lemon

1. Mix all the ingredients in a large pot and heat gently -- stirring frequently. Let the fruity mixture bubble and cook for about 5-7 minutes, or until the rhubarb and apple start to get soft and juicy.

2. Pour the mixture into a baking dish -- keep in mind that if you use a smaller (like 6inch) dish, you'll get pandowdy-like results -- biscuity with a bit of crumble on the top. If you more crumble/crisp- like results, use a larger dish.

For the Topping
1 cup of spelt flour
1/2 cup of rolled oats
1/4 cup of brown sugar
1 tablespoon of minced fresh ginger
1 tablespoon of candied ginger, chopped fine
1/3 cup of butter (I used Earth Balance)


2 tablespoons of maple syrup

1. Mix the flour, oats, sugar and gingers together. Using your fingers, rub the butter into the flour mixture until you get a coarse mealy texture.

2. Add the maple syrup and use a spatula to incorporate into the crumble. Spread the crumble mixture over the fruit mixture.

3. Bake in a 350 degree oven for about 30 minutes, or until the fruit starts bubbling up over the top, and the crumble is nice and golden brown.

Thursday, March 14, 2013

A March Pick-Me-Up


Last March break, I didn't need much of a pick-me-up. It was warm and spring-like and perfect for adventuring outdoors. The year before that was just as good. Sun streamed into my apartment and made for a wonderful, romantic space to work and bake. This year, the week started off promising -- last Saturday and Sunday were gorgeous. But as the week progressed, we saw rain, flurries and now, frigid temperatures. I do see the sun peaking around my balcony -- an excellent sign. But I'm going to need a little more than that to cap off my week of relaxation.

So, I made a little pick-me-up treat: sticky, crumbly date bars. I made them on Monday when it was rainy and damp and perfect baking weather. I haven't worked too much with dates -- I made a nice date snacking cake once, and added it to my granola a few times. But this time, they totally stole the show. And it was easier than I expected. Something magical happens when the dates get softened and cooked in water, and then pureed to a chunky, sweet, sticky filling. Just for kicks, I added some dried cranberries to the date mixture which added a nice subtle tang.


Besides the glorious filling, the rest of the recipe came together in a snap -- basic ingredients like flour, oats, milk, and oil made up the soft cookie-like base, and in the topping was much of the same, with an added sprinkling of nuts. I used chopped almonds, but I think walnuts or pecans would have been better. A handful of shredded coconut would have been a great addition. The whole thing gets baked until the top gets nice and golden. I was nervous when slicing because I thought the filling out ooze out and make a mess but it didn't. These bars are definitely soft and tender and probably won't travel too well in a ziplock bag, but they do slice without falling apart, and are definitely healthy enough to enjoy at breakfast.

The first time I remember eating a date square was with two friends, sitting at the Second Cup at Queen and Augusta (which is now sadly gone) and washing it down with an Italian soda. And while there's no buttery-rich crumble and crust in these vegan ones, one bite and I was sent back to that time.

Vegan Date Bars
adapted from The Yummy Vegan
makes one 8'8 square pan -- about 16 nice sized squares

For the filling:
1.5 cups of pitted dates
1/2 cup of dried cranberries (you could go 100% date -- just add a squeeze of lemon)
1.5 cups of water
2 tablespoons of maple syrup

1. Place the dates, cranberries and water in a pot. Bring to a boil, and then simmer, uncovered for about 10 minutes, or until the dates get soft and start to break down.

2. Puree using the hand-blender to your desired consistency. Add the maple syrup and stir well. Set aside.

For the base:
1 cup of spelt flour
1/3 cup of rolled oats
1/4 cup of brown sugar
1 teaspoon of salt
3 tablespoons of olive oil (or canola, or coconut)
1/4 cup of soy milk (or regular .. or almond)

1. Mix all the ingredients together in a large bowl until a soft dough forms. Press evenly into the bottom of a square baking pan.

For the crumble topping and assembly:
1/3 cup of spelt flour
1/4 cup of rolled oats (or spelt flakes)
1/4 cup of choppd nuts
3 tablespoons of maple syrup
1 tablespoon of olive oil
1/4 teaspoon of vanilla

1. Combine all the ingredients in a bowl. Mix until a loose crumble forms.  On to the assembly!

2. Spread the cooled date filling evenly over the base. Scatter the crumble topping on top and bake in a 350 degree oven for about 25 minutes, or until the top turns nice and golden brown.

3. Cool completely before slicing and enjoying.


Friday, October 12, 2012

Trying my hand at Pie


I almost made a pie once.  But then I didn't.  I turned it into a maple oat crumble and ate it on the day before labour day while watching In the Name of the Father and lamenting about school beginning again. Bummer.

This summer I tried making a pie again. What, you don't believe me?  Here's the proof.


This was a strawberry, rhubarb crumble pie. The filling was delicious, but that's never the hard part. The hard part is always the crust, which I always want to make vegan. In this particular case, the edges of the crust were perfect, but that bottom fell apart, turned soggy and in some spots, didn't even cook properly.

So I tried again this long weekend, on the dreary Sunday that got a little wet and chilly later on in the day, when making pie seemed like the perfect excuse to not to work that I brought home with me. I was totally inspired by the lovely vegan baking goddess over at have cake will travel. Her plum and almond tarts looked so delicious, but I wanted something with apples. While browsing foodgawker, I stumbled upon this dutch apple pie over at Beyond Sweet and Savory. The almond press-in crust totally sold me. It was decided from there.  Apple pie it was.


I made mine with a almond spelt crust, using canola oil and almond milk to bind it instead of butter, and a nice spelt flake crumble on top. To keep the crust from turning soggy, I stuck it in the freezer for a bit, and then pre-baked it for 20 minutes before adding the apples and crumble topping. That totally did the trick. No soggy, uncooked pie bottom. The crust held together nicely and was crispy and flavourful from the ground almonds. If you're expecting a buttery, flaky crust, this isn't the place to look, but it was still delicious enough to merit a mound of cinnamony lemon-kissed apples being piled on top.

A note about the apples: the original recipe calls for 1 cup of brown sugar! If you like your pie super super sweet, go for it, but I put in about 1/4 cup and found it plenty sweet. But then, I had just found perfect Jonagold apples at the market that didn't need much help in the sweet department.

This has been the most successful vegan pie-making experiment to date. Do you think I could pull of vegan pumpkin pie, with a vegan pumpkin custard filling?  Whoa... that's a tricky one.  Stay tuned!

Vegan Apple Crumble Pie with Spelt Almond Crust
inspired by have cake will travel, and Beyond Sweet and Savory

For the Crust:
1 cup of spelt flour
1 cup of almond meal
1/4 cup of natural cane sugar
1/4 cup of canola oil
3-4 tablespoons of almond milk, as needed

For the Filling:
3 large to medium apples (I used one Matsu and 2 Jonagolds)
1/4 cup of brown sugar
1 teaspoon of cinnamon
1/4 teaspoon of nutmeg
juice of half a lemon

For the Crumble Topping:
1/2 cup of spelt flakes
1/2 cup spelt flour
1/4 cup of brown sugar
juice of half a lemon
2 tablespoons of canola oil

1. Make the pie crust. Blend the flour, sugar, and almond meal together. Add the canola oil and stir gently with a wooden spoon or rubber spatula. Slowly, a little at a time, at the almond milk, stirring between additions, until the dough stays together when pinched. You can do this in a food processor too, and pulse until you get the right texture.

2. Bring the dough together with your hands, just enough so that it chunks off, and then press it into the bottom of a 9 inch pie plate, making sure that you're going up the sides evenly.  There's a perfect pie crust. No rolling!  Woo hoo!  Place your pie crust in a freezer for about 15 minutes.

3. Make your filling. Peel and core your apples and slice them thinly (the original recipe suggest 1/4 inch thick .. I'm not sure how thick mine were..). Sprinkle with brown sugar, cinnamon, nutmeg and lemon juice. Toss with together and set aside.

4. Your pie crust is ready for the oven now! Bake it for about 15-20 minutes in a 350 degree oven, or until it just starts to firm up and get some colour.

5. In the meantime, make your crumble topping. Place the spelt flour and flakes in a bowl. Add the brown sugar, lemon juice and canola oil and mix to form a crumble.

6. Take the pie crust out of the oven. Pile your apples on top and sprinkle over the crumble. Throw it all back in the oven and bake for about 35-45 minutes, or until the apple juices start bubbling up, and the crumble topping is a deep golden brown.

7. Yay!  Vegan apple pie!


Tuesday, August 7, 2012

Refreshing Summer Dessert


I've done a terrible job of posting this summer -- I know. It's not the produce -- the berries are beautiful, the greens are abundant, and the sweet corn is sweet as can be, despite the warnings of bad crops because of our warm March and frosty April. Peaches are sweet and juicy, we've already preserved many pints of strawberries (which are still around in some markets!) and blueberries (from Ontario and all the way from B.C.), and I think I've eaten my weight in green beans (although some yellow and purple ones may have slipped in!) and cherry tomatoes. Recently, I'm seeing beautiful local sugar plums and fresh, pretty speckled roma beans and in certain markets, baskets of beautiful red currents.The basil (purple, and regular) on my balcony is flourishing, as is the thyme. The dill had it's run, but the Italian parsley is hanging in there, and the lavender is still very happy.

But alas, despite the market bounty, I've still sucked at posting this summer. I apologize. This is what happens when I take a course: July wizzes by in a blur of papers, reading and typing, and then when it's over, I feel like doing nothing, and then all of a sudden I'm panicking about planning for September. I now remember why it's been 7 years since my last course. However, procrastinating was definitely a part of this process, and for me, procrastinating always means time in the kitchen.

This time, it involved internet re-runs of the cooking show French Food at Home.  Have you seen that show with Laura Calder? She's incredible, and the other day, I watched her make a wine jelly: a beautiful molded jelly with red and green grapes trapped inside. Beautiful. I wanted to make a non-alcoholic version and take it one step further by trapping bubbles (i.e. carbonation!) in the jelly with the fruit. I also used a vegan substitute for gelatin: agar. It's a jelling agent derived from seaweed and very popular in vegan baking. You could probably get pure, fancy agar flakes at the health food store, but I got mine at an Asian grocery store, and it also contained sugar, so it pretty much worked just like gelatin -- check out this website for details.  Laura used white wine sweetened with sugar in her recipe -- I used white grape juice (totally delicious!) and mixed it with lemon flavoured sparkling water to make up for the extra sugar.  The result was awesome: beautiful summer fruits in a tingly, sweet jelly -- the carbonated water totally worked, and made this dessert extra special. I'm sure if you're in the mood for alcohol, a nice sparkling wine (Prosecco perhaps?) would work nicely. Whatever you choose, go the sparkling route. the jelly leaves a nice tingly sensation on your tongue and makes you savour and enjoy every bite.

Summer can't be over yet, right? Right?!

Sparkling Jelly with Summer Fruit
inspired by Laura Calder
serves 4

1 large peach
1/2 pint of fresh raspberries
1 cup of white grape juice
1 cup of lemon flavoured sparkling water
1 tablespoon of sugar-agar powdered mixture or gelatin
2 tablespoons of water

1. Cut your peach into quarters. Cut each quarter into six little cubes and place them in 4 half-cup ramekins. Divide the raspberries evenly between the ramekins. Set aside.

2. Dissolve the agar in the water and let it sit for a bit. Meanwhile, heat up the grape juice in a small pot. As it just comes to a simmer, add in the agar-water mixture and bring it to a boil. Turn off the heat immediately and add the sparkling water.Stir well.

3. Pour the liquid mixture into the ramekins. Let them sit at room temperature until they cool down. They will probably set as they cool. Place them in the fridge to chill.

4. Enjoy!


Sunday, May 13, 2012

Blueberry Crisp for Grandma


I love making treats for my Grandma.  She's usually not a sweet dessert kind of person, but she enjoys treats and today was the perfect day to make something in her honour.  Every year on mother's day, my Mom is usually away on vacation, so we celebrate mother's day and father's day together when she gets back.  But on mother's day, we also take the time to chill out with our Grandma -- a very special person indeed.  She raised us when we were little and our Dad was working the night shift and our Mom had to go back to work. She picked us up from school, made us breakfast and lunch, and played silly games with us during our summer vacation.


My Grandma has been feeling sick lately, so she didn't feel like going to a restaurant for mother's day brunch.  We brought brunch to her this year, and this fresh blueberry crisp was the perfect way to end it. Truth be told, I really wanted to bake something with rhubarb, but our local markets didn't have any, so I settled for nice pints of sweet, floral blueberries.  I wanted to maintain the freshness of the fruit -- I've tried too many crisps and crumbles where the fruit is jammy and super sweet, not something my Grandma would appreciate.  So I kept everything simple -- no cornstarch or thickeners, just fresh fruit, lemon juice and zest and a sprinkling of sweetness.  The crisp topping baked up in nice lovely crumble chunks with an added nuttiness from the use of spelt flour.  It was a lemony, fresh, just sweet enough crisp, perfect to end mother's day brunch.  It we had a bit of fresh thyme, I'd throw some in for sure, and it were Ontario peach season, I'd definitely consider a peach and blueberry crisp.  But it's perfect as it is, and Grandma loved it, which was the most important part.

Happy Mother's Day!

Lemony Blueberry Crisp
serves 4-6

1 pint of fresh blueberries, washed
juice and zest of 1 lemon, divided
1 tablespoon of natural cane sugar
1/2 cup of spelt flour
3/4 cup of rolled oats
3 tablespoons of honey
2 tablespoons of canola oil

1.  In a baking dish, combine the blueberries, sugar and half the lemon juice and zest.  Toss lightly.  Set aside.

2.  In a bowl, stir together the flour, oats and the other half of the lemon zest.  Add the lemon juice, oil and honey and mix well.

3.  Crumble the oat mixture over the fruit and bake at 350 degrees for about 30 minutes, or until the fruit just starts to bubble and the topping gets nice and golden.

4.  The dessert begs for ice cream or whipped cream, but if you eat it on it's own, you could definitely call it breakfast!

Thursday, May 3, 2012

Lemon Picnic Loaf


It's May!  Almost time for rhubarb and strawberries, fiddle heads and asparagus, long bike rides and picnics.  Do you like picnics?  I confess that I've probably never planned a perfect picnic with little containers or mayo-free salads and glass jars filled with lemonade.  But we've had lovely coffee + scone breaks in the park, PBJs from plastic lunch containers pulled from our bike packs, and lots of ice cream (cones and cups) and icy drinkings while strolling or lounging on grassy, hilly areas of the park.


I love the idea of picnics and one day this summer, perhaps I'll plan the perfect picnic with a perfect picnic menu, one that includes the perfect picnic dessert -- a dessert that's fuss-free, not to sticky or melty and one that definitely won't get squished on the way to the park.  A dessert like this lovely lemon loaf.  It's refreshing and lemony and just sweet enough to be called dessert.  Add a little glaze on it, and it would definitely be a great contender next to those chocolatey treats that we sometimes need a break from.


This loaf is sturdy, but not stodgy.  It has a nice, tender crumb, and even though it's vegan (meaning no eggs to keep it together), it does not fall apart when you bite it.  The flavour is lemony and zingy with just a little bit of nutty from the spelt flour.  I know this is not sounding like dessert, but trust me, one bite -- maybe two-- and you'll be addicted.  It's the kind of dessert that packs well and is great at finishing off a meal on the road, but if you had it at home, it would beg for blueberry sauce, ice cream or a sweet sticky glaze. 

It's delicious straight up, but added fresh berries would be an awesome treat, as would some lemon curd (I found an awesome recipe for vegan lemon curd that I'm dying to try) layered in the middle, or even dried fruits.  I had it plain the first time, and then the next, I added dried blueberries.  Totally awesome. 


Vegan Lemon Spelt Loaf
makes one small loaf
adapted from Liz Lemon Nights

juice and zest of 2 medium-sized lemons
3/4 cup of almond milk
1/2 cup of natural cane sugar
splash of vanilla extract
2 tablespoons of canola oil
1/2 teaspoon of baking powder
1/4 teaspoon of baking soda
2 teaspoons of cornstarch
1.5 cups of spelt flour

1.  In a small bowl, combine the lemon juice and zest, almond milk, sugar, vanilla and canola oil and whisk to combine.  Set aside.

2.  In a large bowl, sift together the flour, baking powder and soda, and cornstarch.  Add the dry ingredients to the wet ingredients slowly, mixing gently during the process.  The mixture will be quite runny.  Let it sit for about 5 minutes or so while the oven preheats.

3.  Pour the batter into a prepared loaf pan and bake at 350 degrees for 45-50 minutes, or until the loaf gets a lovely golden brown colour, and a cake tester inserted comes out clean. 

4.  Enjoy!  Happy picnicing!

Sunday, April 22, 2012

Silky Smooth Asian-Style Brown Sugar Custard Tarts


I know some people who get inspiration to cook from the food they eat at restaurants.  My Auntie used to re-make restaurant dishes at home all the time.  We'd go out to eat and she'd taste something she really liked, and then soon, she'd be concocting her own version at home.  She found it a real challenge to try to make something taste authentic.  And I loved watching her and asking a million annoying questions.

When I bake and cook, it's usually something I've seen on blogs, or something I have a craving for.  I've rarely, until recently, tried to re-make restaurant food at home, but now I see how satisfying it can be.  It was awesome when I made Chinese steamed sweet red bean buns at home -- like having dim sum without the grease and the wait!  I've also made baked barbecue pork buns with the help of my Dad (who made the filling) and this lovely, easy bread recipe.  I even glazed it and everything!  Most recently, I tried my hand at making Chinese custard or egg tarts.  Ever had them?  They're a sweet, smooth, barely flavoured custard baked with a flaky crust that's a cross between savoury and sweet.  I used to have them all the time when I was little, and never imagined I'd be making them myself at home.


But I did!  I wanted something special and cute to bring to my Mom as a surprise treat one day, and these tarts were just the thing.  They're relatively easy to make, and the custard feels so silky and lovely in your mouth, especially good when you eat them warm.  The recipe I used seemed odd at first -- measurements of liquids in grams and the half an egg yolk really threw me off!  It was also a recipe that made 7 tarts -- an odd number, I thought.  But I pressed onward, changing grams to milliliters, and carefully adding in just half an egg yolk.  It turned out fantastic!  And because I used brown sugar, it got an added caramel taste you won't find in the tarts at the Asian bakeries.

A few notes about the recipe.  It calls for evaporated milk, but not too much of it.  If you don't feel like opening a whole can just a few tablespoons, I think it's safe to say that regular whole milk or non-dairy milk (as long as it's not the lite kind) will work find.  Light cream (like the cream you might have for your coffee) would probably also be good.  Also, you'll need to get those tin foil tart shells to press the crust in. They're about 3'1.5 inch shells. You could try doing it in a muffin pan, but be extra careful when pulling them out, as the pastry shells are quite delicate.

Asian-Style Brown Sugar Custard Tarts
adapted from The Missing Lokness
makes 7 tarts

Crust:
1/4 cup of Earth Balance margarine (or salted butter)
3 tablespoons of powdered sugar
3/4 cup of all purpose flour
1/2 a large egg yolk
2 teaspoons of evaporated milk

Custard:
9 tablespoons of water
1/4 cup of brown sugar
2 large eggs
3 tablespoons of evaporated milk

1.  To make the crust, cream together the margarine and powdered sugar until well combined.  Add the egg yolk and mix well.

2.  Add the flour and mix, slowly, adding the milk as you mix.  Keep mixing until you get a nice soft dough.  You might need to add a few extra drops of milk.  Form the dough into a ball and refrigerate for about 30 minutes.

3.  Meanwhile, make your custard.  First add the water to pot and bring to a boil.  Add the sugar and cook until the sugar has dissolved.  Set aside to cool.

4. In a large bowl, beat the eggs and evaporated milk until well-combined.  Add in the cooled sugar syrup and mix well.

5. Take your dough out of the fridge and divide it into 7 little balls.  Press them into the tart shells and fill will the custard mixture, making sure to leave a bit of room at the top.

6.  Bake your tarts in a 375 degree oven until the custard jiggles slightly when tapped.  Serve warm.

Sunday, February 12, 2012

An Easy Little "I Love You" Treat


I'm not a huge fan of Valentine's Day. Sure, it's lovely to see the kids at school exchanging Hershey kisses and little pink and red cards, and getting all hyped up on those irresistible-even-to-adults cinnamon heart candies. It's nice. But this year, report cards come out on Valentine's Day, which puts a damper on things, and to make matters worse, where we would have had the Valentine's dance, we have to get ready for parent-teacher interviews instead. Yup, the new reporting schedule kind of bums out Valentine's Day at school, but I'm sure the children will get over, and plus, who needs the drama of 13 years olds "dancing" on Valentine's Day anyway?


That being said, I always take Valentine's Day as an excuse to bake treats for the people I love. I remember one year when I was in university, I woke up early and baked this fudgey chocolate cake from the Canadian Living Cooks show and made a mixed CD for my "valentine" at the time. We ended up arguing about the impending war on terror and I swear I almost called it quits right then and there (my leftist tendencies were obviously unappreciated in that relationship!). Clearly, we weren't meant for each other. And I don't think I've ever baked that cake again.


Now that I've found my real Valentine, I admit that we haven't really celebrated the day in awhile, but baking treats to show love always seems to be on the agenda. And these little polenta madeleines fit the bill perfectly. They're lemony and fruity from the olive oil, and oh so tart and easy to pop into your mouth. You definitely don't need Valentine's day as an excuse to make them, though they are a nice change from the usual rich chocolately things that make their way onto Valentine's day menus. The recipe is simpler and lighter than a traditional madeleine, though I'm sure Marcel Proust would have approved (ok.. I take that back.. I'm not sure.. but Nathalie Sarraute would have for sure!). Don't sweat it if you don't have a special madeleine pan -- a mini-muffin pan will work just fine. If you serve it up with macerated strawberries, it might just pass off as elegant, although I much prefer them with cup of afternoon weekend coffee.

Lemon Polenta Madeleines
from Hot from my Oven
makes 10 baby madeleines and 2 big muffins

1 egg
1/2 cup of sugar
2 tablespoons of good olive oil
3 tablespoons of yogurt
zest and juice of one lemon
3/4 cup of polenta
1/4 cup of whole wheat pastry flour
1/2 teaspoon of baking soda

1. In a large bowl, beat the sugar, egg, olive oil, yogurt, lemon juice and zest until thick and ribbony (about 5ish minutes by hand).

3. Add the polenta, sift in the flour and baking soda and mix until just combined. Let the mixture sit for 10-15 minutes.

4. Spoon the batter into a prepared pan of your choice and bake in 350 degree oven until light golden brown and a cake tester inserted comes out clean (for the madeleine pan, it only took about 15 minutes).

Saturday, October 29, 2011

Buried!


Help! I'm buried under report cards. I want to be having brunch on a sunny window seat with two of my favourite people, or sipping coffee and reading at the cafe down the street, or riding my bike through the fall colours of High Park, or taking a walk in the market and buying 5 different kinds of apples and a pumpkin ... but I'm not.


I'm stuck at home working on this beautiful weekend. Even as I type this I'm feeling guilty for not typing progress report comments instead. So enough! Go make this PBJ quick bread. It's sweet and peanut buttery and comforting and it will make your house smell like a bakery. The recipe is from Celine at have cake, will travel.

I have cake. I wish I were travelling ...

PBJ Quickbread
adapted from have cake will travel

3/4 cup of soy milk
6 tablespoons of natural peanut butter
1/4 cup of strawberry jam
juice of half a small lemon
a splash of vanilla extract
2 tablespoons of brown sugar
1 cup of oats
1/3 cup of whole wheat or spelt flour
1/2 teaspoon of baking powder
1/2 teaspoon of baking soda

1. In a large bowl, whisk together the soy milk, peanbut butter, jam, lemon juice, vanilla and brown sugar. Whisk it really good until everything is nicely combined and smooth.

2. Sift in the flour and baking powder and soda. Add the oats and give it a good mix.

3. Pour into a greased loaf pan and bake in a 350 degree oven for 35-40 minutes, or until the top is nice and golden brown and your house smells likes heaven.

4. Wouldn't this be great sliced and topped with bananas? Or Nutella?

Saturday, May 14, 2011

Spring Spring..


Spring = busy. Spring = almost insanely busy. Spring = distracting sunshine that prevents me from working on the weekends. Today, though, is foggy and rain is threatening to fall .. Spring = rain as well.

Spring also means Mother's day and I guess I should have posted some Mother's Day treats last weekend, but I just didn't get around to it. My own mommy is off gallivanting in east Asia, and my Grandma was more than happy with her noodle-y brunch and piece of apple cake. Instead of working or blogging, I went bike-riding instead. Bad me.

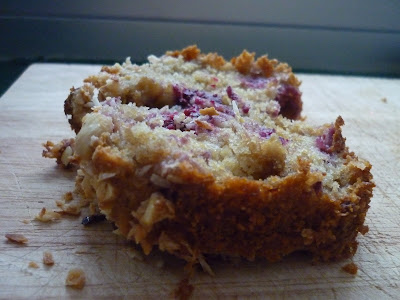
This weekend, however, I'm stuck at home procrastinating on an inevitable teacher's year end task: reports. Yes, again. I'm currently taking a break and thinking about thing many things I can make for my Mom when she returns, and I'm reminded fondly of this healthy, tasty, fruity, coconut-topped loaf that I served to my parents on Family Day way back in February. It's not just any old loaf -- it's totally special and worth serving the most important of guests, like your mommy. I'm not a stranger to making loaf cakes, but I wanted this one to be more special. I got the idea for the coconut topping from Heidi over at 101 Cookbooks, who made a cherry tart with a macaroon topping. My mom loves coconut, so this was perfect for her.


This loaf is as simple as it gets. Whole wheat flour, a little rolled oats, frozen berries (although the fresh ones are coming soon! They would be fabulous in this recipes) and a splash of real fruit juice topped with a simple mixture of coconut, chopped hazelnuts and maple syrup. It was the perfect tea time treat and my Mom loved it. If you're like me and didn't get to spend Mother's Day with your mom, bake her up this beautiful loaf, just because. It'll be even more special.

Whole Wheat Raspberry Loaf with Macaroon Topping
inspired by 101 Cookbooks

1/4 up of rolled oats
6 tablespoons of skim milk yogurt
splash of vanilla
2 tablespoons of brown sugar
1 tablespoon of honey
1 egg
2 tablespoons of canola oil
2 tablespoons of fruit juice
1/2 cup of all purpose flour
1/2 cup of whole wheat flour
1 teaspoon of baking powder
1/2 teaspoon of baking soda
1 cup of raspberries (fresh or frozen)

1/4 cup of unsweetened coconut
1/4 cup of chopped hazelnuts
3 tablespoons of maple syrup

1. In a large bowl, combine the oats, yogurt and vanilla and let stand for about 15 minutes.

2. Whisk in brown sugar, honey, oil and fruit juice.

3. Sift in the flours, baking powder and baking soda and mix until just combined.

4. Fold in the berries. Pour the batter in a loaf tin.

5. Make the topping my combining the coconut, hazelnuts and maple syrup. Sprinkle over the loaf.

6. Bake in a 350 degree oven for 30-35 minutes, or until the topping gets dark and crunchy and a cake tester inserted comes out clean.

Sunday, April 24, 2011

Pear and Plum Grunt for Two


Yeah, I just used the word "grunt" in a title of a recipe. Yeah, it's an actual food word, not just a sound that comes out of us when we're grumpy. A grunt, better know as a slump, is one of those fruit and biscuit combinations. So many names .. betty, crumble, crisp, cobbler, pandowdy (that one's almost as bad as grunt!). What distinguishes a grunt from a cobbler, is the cooking of the biscuit topping. Instead of baking it in the oven so that top gets golden and crunchy, the biscuit batter is spooned on top of fruit that's been simmering in a pot, the lid goes on, and magically, the biscuits turn into these soft, pillowy, dumpling-like things that have the essence of the fruit steamed right into them. Yum.

It was really really easy to make, and it was the perfect thing to share with my Grandma. I made it last weekend for just the two of us to share, but I'm sure the recipe doubles quite easily. For the fruit, I used a pear and a plum instead of the apricots that the original recipe called for, but I think this dessert would work with any kind of fruit that strikes your fancy.

I checked the weather forecast for this coming week and it looks like rain, rain and more rain. I don't mind really.. just an excuse to curl up with a warm, spicy dessert, and another season of X-Files.


Pear and Plum Grunt for Two
adapted from Eating Well

1 large bosc pear, peeled and diced
1 black or red plum, peeled and diced
juice and zest of half a lemon
pinch of cardamom
2 tablespoons of honey or maple syrup

1/4 cup of whole wheat flour
1 tablespoon of sugar
1/4 teaspoon of baking powder
1/8 teaspoon of baking soda
pinch of salt
2 tablespoons of plain yogurt
1 tablespoon of canola oil
1/2 teaspoon of sugar with a pinch of cinnamon mixed in

1. Place the fruit, lemon zest and juice, honey and cardamom in a small pot cook on medium heat for about 5-7 minutes, or until the the liquid gets a bit thick and the fruit starts to soften.

2. In the meantime, prepare the biscuit topping by sifting the flour, baking powder, baking soda, sat and sugar together. Add the yogurt and canola oi and mix with a fork until just blended.

3. Drop spoonfuls of batter over the cooking fruit and sprinkle with the cinnamon sugar. Put the lid on the pot and cook (peaking as little as possible) for about 12-15 minutes, or until the biscuit is puffed and cooked.

4. Serve warm and enjoy with someone you love.

Saturday, January 8, 2011

Rosemary Olive Oil Cake with Chocolate


Yes. I'm totally backwards. During the time of the holidays when I should have given you pictures and recipes of treats and special desserts, I gave you macaroni and lentil soup. Now it's January, and you're probably wanting something hearty, warm and healthy to cleanse away all the holiday indulging. But I'm offering you cake. Why do you put up with me? Ok, don't answer that. Just keep reading.

Why am I giving you a cake in January? Well for starters, it's a semi-healthy cake, made with whole wheat flour, and heart-healthy olive oil, which I even reduced in quantity from the original recipe and replaced with skim milk yogurt. Sounding better? Here's the real kicker. It's got a whole tablespoon of chopped rosemary. Rosemary. Go figure. I would never have thought to make a chocolate, rosemary olive oil cake, but trust me, it's delicious. My sister pointed out that the chocolate/rosemary combination tasted a bit like ginger and chocolate .. really interesting, almost spicy, very very addictive and delicious. This cake also has a nice sugar-crusted top and an incredibly moist crumb, even with the reduction in oil. It needs no icing, glaze or frosting -- so no extra calories -- and it's a crowd pleaser for sure. I made it for a New Year's family dinner and it was a big hit. If you wanted to be really good, you could use a higher quality dark chocolate bar instead of chocolate chips, like I did, or skip the chocolate all together and add in some lemon zest instead. Who says you can't have cake in January?


Ok, so I'm going to confess. I'm looking for rosemary recipes. Why? Well, while everyone else is wrapping up their Christmas trees to be taken away to the pulp and paper mill, or where ever your Christmas trees end up when the season is over, we were carefully picking all the needles off of our little rosemary tree. Yup! We decorated a rosemary tree -- our very first Christmas tree, anointed with home-made decorations made of dyed macaroni and egg cartons -- and now, we've got a whole lot of rosemary cooking and baking to do. Any suggestions?

Rosemary Olive Oil Cake with Chocolate
adapted from 101 Cookbooks

1 egg
1/4 cup of skim milk yogurt
1/3 cup of olive oil
1/3 cup of milk
1 tablespoon of honey
1 tablespoon of chopped rosemary
1/3 cup of whole wheat flour
3/4 cup of all purpose flour
1/4 cup of sugar
3/4 teaspoon of baking powder
pinch of salt
1 tablespoon of coarse sugar

1. Whisk together the egg, yogurt, olive oil, milk, honey and rosemary until well-combined.

2. Sift in the flours, sugar, baking powder and salt. Mix until just combined. Stir in the chocolate chips.

3. Pour the batter into a prepared loaf pan or cake tin. Sprinkle with coarse sugar.

4. Bake in a 350 degree oven for about 45 minutes, or until golden and crusty on top and a cake tester inserted in the middle comes out clean. Stays incredible moist for a week (I just had another piece!) in an air tight container. Happy January!


Coffee Update!

Manic Coffee: three cappuccinos, a wild blueberry scone and a ginger molasses cookie. So crowded! We were lucky to get a seat at all!
Quaff Cafe: two cappuccinos and a double americano, with a alfajore cookie and an oatmeal cookie.

Thursday, September 23, 2010

Cleansing Treats


Who says you can't have treats while you're cleansing?? It's mid-week, I cleansed yesterday, crashed at 8:00pm after a long day at work, but I still had time for a little treat: Chocolate Banana Softserve with Strawberries. What?! That's not part of the cleanse?! Oh, but yes, yes it is. No dairy or sugar added .. inspired by Maya and Eliza and their creative blended frozen fruit desserts. The texture and taste were right on. I don't need to say more ... just MAKE IT!!


Chocolate Banana Softserve with Strawberries
inspired by nourishing mornings and pistachios and rainbows

1 frozen banana
1 teaspoon of cocoa powder (unsweetened)
1/4 cup of soy or almond milk (plus more if needed)
a handful of strawberries, sliced

Put everything in a blender or mini chopper and whiz until smooth and creamy. You might have to add more liquid depending on the size of your banana. Serve with fresh sliced strawberries and don't you DARE feel guilty about eating THIS dessert!

**I'm going to try it tonight with frozen banana, frozen blueberries and almond extract.

Saturday, May 1, 2010

Sisterly Tribute


So, like I mentioned before, this week kinda sucked. It dragged on and on and to make matters worse, there was drama at the very beginning. I'm so happy that it's the weekend, and I'm not even minding that it's drizzly and grey outside; I'm just glad that the work week is over and I can put it behind me.

I hate drama, especially when it messes up my routine, which it definitely did this week. Thankfully, I had someone to bail me out: my sister. I love my sister. We've been through a lot together. We hated each other when we were younger, became best friends when we were teenagers, drifted apart when we both got serious boyfriends, and then drifted back together when we both realized that there's no one in the world that we love in quite the same way as we love each other. I know people that hate their siblings and find it a chore to be around them, and I always feel so sad for them. To be lucky enough to have a sibling is a blessing, one that you should cherish forever. And boy was I glad to have a sister this week. She was there for me in a heartbeat, helping me out of a particularly tricky situation, and as usual, wanted nothing in return.

The least I could do was write a post in her honour. So here it is: Nigella Lawson's Chocolate Cloud Cake. I made this cake for her birthday last year, and after tasting it, she wanted the recipe. I found that strange, since she rarely used to bake, but since that first bite of cake, she's made this recipe for herself quite a few times. She's definitely a chocolate fan, one of the original dark chocolate lovers before it got all sexy and healthy and everyone started pretending that they liked it better than milk chocolate. She's always preferred dark chocolate. I remember her coming home one day with a box of semi-sweet baking chocolate to snack on because there were no good chocolate bars at the grocery store. And I remember having the Swiss Chalet Festive Special with her and giving her my blue Lindor truffles in exchange for the red ones. Dark chocolate all the way. And that's what you need for this recipe -- a dark chocolate with at least 70% cocoa solids, because you'll definitely taste the difference. It's a flour-less, chocolately, melty, gooey rich treat and I wish she were here this weekend, so that I could make one for her to show her how much I love her.

But she's off chasing indy music shows in eastern Ontario this weekend, so I'll have to wait for another time. In the meantime, I'm sharing this recipe with you, so perhaps if you have a sibling, you'll make them a yummy chocolate treat just to show them how much you care.

Nigella's Chocolate Cloud Cake
(I basically halved the original recipe and left out the orange zest and Cointreau. For the birthday party, I made the whole thing including the whipped cream topping, but for a weekend treat, I'd stick to half, sans whipped cream.)

4.5 ounces of dark chocolate, chopped
62 grams of unsalted butter (about 1/4 cup)
3 eggs: 1 whole, 2 separated
85 grams of sugar (about 1/3 cup)

1. In a saucepan, melt the chocolate and the butter over low heat, stirring constantly. Set aside and let it cool down. (Yeah, I know, it's a faux pas to put chocolate over a direct flame, but the butter kind of protects it, and it should be ok if you keep a close eye on it.)

2. In a large bowl, beat 1 whole egg and 2 yolks with half the sugar until it gets light, fluffy and ribbony. Gently fold in the chocolate mixture.

3. In another bowl, beat the egg whites, adding the rest of the sugar a little at a time, until soft peaks form.

4. In three stages, add the egg whites into the chocolate mixture, folding gently so that you don't deflate it.

5. Pour it into a prepared pan and bake in a 350 degree oven for about 20 minutes, or until the top is shiny and cracked and the smell makes you think that your kitchen has turned into that 24-hour chocolate factory in Spain. Remove from the oven and don't be disappointed when it sinks -- it's supposed to! Add your whipped cream on top if you're using it, or just dig in and satisfy that dark chocolate craving. Don't forget to share it!

Wednesday, March 31, 2010

The No-Fail Gift

Do you remember that crazy, silver spray-painted macaroni wreathe that you made in kindergarten and presented proudly to your parents as soon as you got home? Ever wonder why your mom keeps it hung up on the wall after all these years, talks about it to every guest, and yet that beautiful angora sweater that you bought her for her birthday last year hasn't been worn even once? Well, it's because what your kindergarten teacher told you was true: the best gifts are the ones you make. The mixed tapes (or CDs .. or mp3 playlists now a days??), home-made cards, the photo frames with favourite memory pictures ... and the jar of cookies with the bow tied to it. Gifts that come from the heart are almost always ones that you put your love and sweat into by making.
When I want to make a special treat for the ones that I love, I always look to my "no-fail" recipes. They're different for different people. For my Dad, it would be "fluffy cake" (a plain butter and sour cream pound cake), for my sister and best friend, probably chocolate chip cookies, for my cousin it would be peanut butter cookies. For my love, it's got to be apple crumble.

I first made apple crumble with my sister. We guessed at the ingredients and method, and made it quite a few times before writing the measurements down.I remember her saying "So how do you think we get the butter and flour and sugar to be crumbly." And I said, quickly recalling a foodTV episode "Anna Olsen says you rub the butter into the flour and sugar until it looks likes peas." We did just that, and it worked perfectly. Over the years, I've tried fiddling with the recipe, adding oats, cinnamon, or using whole wheat flour. But the original version always gets the best reviews. I made it the other night as a special request and it was, as always, very well received. So please try this recipe -- even if you're like my apple-hating best friend (yeah, she hates apples! Who hates apples?!), I'm confident that you'll take a second bite.

No-Fail-I-Love-You Apple Crumble

2-3 apples (my favourite is Empire), peeled, cored and cut into small chunks
1/2 + 2 tablespoons of brown sugar
a pinch of cinnamon
1/2 cup of butter, cold, cut into small cube, + 1 tablespoon for the apples
3/4 cup of all purpose flour

1. Preheat your oven to 350 degrees.

2. Place your apple chunks, cinnamon, 1 tablespoon of butter and 1 tablespoon of brown sugar in a pot and cook on low, stirring occasionally.

3. While the apples are cooking, make your crumble. Put the flour and brown sugar in a large mixing bowl and stir around until mixed together. Add the butter and rub it against the flour until the mixture has lumps the size of peas (just like Anna Olsen said!). Put half of this mixture in the bottom of a pie plate or cake pan and bake for about 15 minutes or until it gets golden and fragrant. Remove from the oven.

4. When the apples have softened, spread them out on top. Add the remaining crumble mixture and put the whole thing back in the oven for 20 minutes or until the top gets brown and you can smell cinnamon and apples coming from your oven.

5. Present it to the love of your life with pride.